/**
 * Utility functions for the foo package.
 * @module foo/util
 * @license Apache-2.0
 */
예제2
독립라이센스가 있는 파일
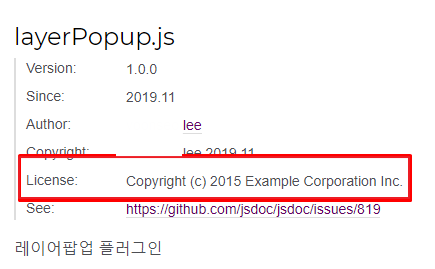
/**
 * @license
 * Copyright (c) 2015 Example Corporation Inc.
 *
 * Permission is hereby granted, free of charge, to any person obtaining a copy
 * of this software and associated documentation files (the "Software"), to deal
 * in the Software without restriction, including without limitation the rights
 * to use, copy, modify, merge, publish, distribute, sublicense, and/or sell
 * copies of the Software, and to permit persons to whom the Software is
 * furnished to do so, subject to the following conditions:
 *
 * The above copyright notice and this permission notice shall be included in all
 * copies or substantial portions of the Software.
 *
 * THE SOFTWARE IS PROVIDED "AS IS", WITHOUT WARRANTY OF ANY KIND, EXPRESS OR
 * IMPLIED, INCLUDING BUT NOT LIMITED TO THE WARRANTIES OF MERCHANTABILITY,
 * FITNESS FOR A PARTICULAR PURPOSE AND NONINFRINGEMENT. IN NO EVENT SHALL THE
 * AUTHORS OR COPYRIGHT HOLDERS BE LIABLE FOR ANY CLAIM, DAMAGES OR OTHER
 * LIABILITY, WHETHER IN AN ACTION OF CONTRACT, TORT OR OTHERWISE, ARISING FROM,
 * OUT OF OR IN CONNECTION WITH THE SOFTWARE OR THE USE OR OTHER DEALINGS IN THE
 * SOFTWARE.
 */
출력화면
출력 이미지
함수에 사용할 수 있는 주석
@this
해당 함수내부의 this가 참조하는 것을 표시
문법
// @this <namePath>
예제
/** @constructor */
function Greeter(name) {
	setName.apply(this, name);
}

/** @this Greeter */
function setName(name) {
  /** document me */
  this.name = name;
}
출력화면
출력 이미지
@constant (@const)
상수를 표시
문법
// @constant [<type> <name>]
예시
/**
 * @constant
 * @type {string}
 * @default
 */
const RED = 'FF0000';

/** @constant {number} */
var ONE = 1;
@description (@desc)
설명을 표시
문법
// @description <some description>
예제
첫번째 줄일때에는 생략가능
/**
 * Add two numbers.
 * @param {number} a
 * @param {number} b
 * @returns {number}
 */
function add(a, b) {
	return a + b;
}
예제2
첫번째 줄이 아닐때
/**
 * @param {number} a
 * @param {number} b
 * @returns {number}
 * @description Add two numbers.
 */
function add(a, b) {
	return a + b;
}
/**
 * @param {(string|string[])} [somebody=John Doe] - Somebody's name, or an array of names.
 */
 function sayHello(somebody) {
 	if (!somebody) {
    	somebody = 'John Doe';
    } else if (Array.isArray(somebody)) {
    	somebody = somebody.join(', ');
    }

    alert('Hello ' + somebody);
}
예제3
파라미터에 속성이 있을때
/**
 * Assign the project to an employee.
 * @param {Object} employee - The employee who is responsible for the project.
 * @param {string} employee.name - The name of the employee.
 * @param {string} employee.department - The employee's department.
 */
Project.prototype.assign = function(employee) {
	// ...
};
예제4
파라미터가 배열, 속성이 있을경우
/**
 * Assign the project to a list of employees.
 * @param {Object[]} employees - The employees who are responsible for the project.
 * @param {string} employees[].name - The name of an employee.
 * @param {string} employees[].department - The employee's department.
 */
Project.prototype.assign = function(employees) {
	// ...
};
출력화면
출력 이미지
@requires
필요한 모듈이 있음을 표현
문법
// @requires <someModuleName>
예제
/**
 * This class requires the modules {@link module:xyzcorp/helper} and
 * {@link module:xyzcorp/helper.ShinyWidget#polish}.
 * @class
 * @requires module:xyzcorp/helper
 * @requires xyzcorp/helper.ShinyWidget#polish
*/
function Widgetizer() {}
출력화면
출력 이미지
@callback
콜백으로 받은 인자 및 반환 값에 대한 정보 제공
문법
// @callback <namepath>
예제
클래스 별
/**
 * @class
 */
function Requester() {}

/**
 * Send a request.
 * @param {Requester~requestCallback} cb - The callback that handles the response.
 */
Requester.prototype.send = function(cb) {
	// code
};

/**
 * This callback is displayed as part of the Requester class.
 * @callback Requester~requestCallback
 * @param {number} responseCode
 * @param {string} responseMessage
 */
예제2
글로벌
/**
 * @class
 */
function Requester() {}

/**
 * Send a request.
 * @param {requestCallback} cb - The callback that handles the response.
 */
Requester.prototype.send = function(cb) {
	// code
};

/**
 * This callback is displayed as a global member.
 * @callback requestCallback
 * @param {number} responseCode
 * @param {string} responseMessage
*/
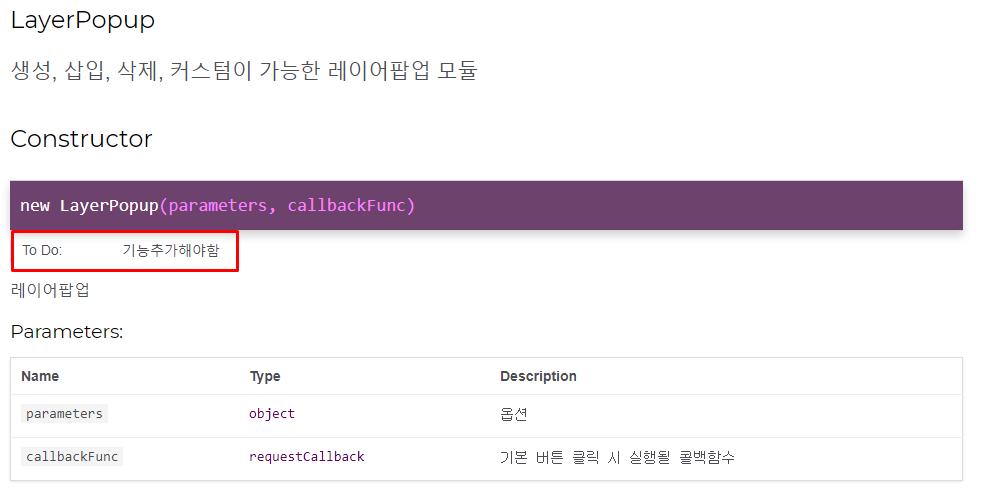
@todo
해야하거나, 완료해야할 작업이 필요할때 표시
단일 주석에 두번 사용 금지
문법
// @todo text describing thing to do.
예제
/**
 * @todo Write the documentation.
 * @todo Implement this function.
 */
function foo() {
	// write me
}
출력화면
출력 이미지
@return (@returns)
함수가 반환하는 값을 표시
문법
// @returns [{type}] [description]
예제
/**
 * Returns the sum of a and b
 * @param {number} a
 * @param {number} b
 * @returns {number} Sum of a and b
 */
function sum(a, b) {
	return a + b;
}
출력화면
출력이미지
@see
연관성 있는 문서나 리소스 참조함을 표시
{@link} 와 같이 사용 가능
문법
// @see <namepath>
// @see <text>
예제
/**
 * Both of these will link to the bar function.
 * @see {@link bar}
 * @see bar
 */
function foo() {}

// Use the inline {@link} tag to include a link within a free-form description.
/**
 * @see {@link foo} for further information.
 * @see {@link http://github.com|GitHub}
 */
function bar() {}
출력화면
출력이미지
@link ({@linkcode}, {@linkplain})
namepath 또는 url에 대한 링크 생성
문법
// {@link namepathOrURL}
// [link text]{@link namepathOrURL}
// {@link namepathOrURL|link text}
// {@link namepathOrURL link text (after the first space)}
예제
/*
 ** See {@link MyClass} and [MyClass's foo property]{@link MyClass#foo}.
 * Also, check out {@link http://www.google.com|Google} and
 * {@link https://github.com GitHub}.
 */
function myFunction() {}
@since
클래스, 메서드 등이 특정 버전에서 추가되었을때 사용
문법
// @since <versionDescription>
예제
/**
 * Provides access to user information.
 * @since 1.0.1
 */
function UserRecord() {}
/**
 * Solves equations of the form a * x = b
 * @example
 * // returns 2
 * @example <caption>Example usage of method1.</caption>
 * // returns 2
 * globalNS.method1(5, 10);
 * @returns {Number} Returns the value of x for the equation.
 */
globalNS.method1 = function (a, b) {
	return b / a;
};
/**
 * My namespace.
 * @namespace
 */
var MyNamespace = {
  /** documented as MyNamespace.foo */
  foo: function() {},

  /** documented as MyNamespace.bar */
  bar: 1
};
예제2
/**
 * A namespace.
 * @namespace MyNamespace
 */

/**
 * A function in MyNamespace (MyNamespace.myFunction).
 * @function myFunction
 * @memberof MyNamespace
 */
예제3
/** @namespace window */
/**
 * Shorthand for the alert function.
 * Refer to it as {@link window."!"} (note the double quotes).
 */
window["!"] = function(msg) {
	alert(msg);
};
@inner
네임스페이스 태그의 부모-자녀 참조
예제
/** @namespace */
var MyNamespace = {
  /**
   * foo is now MyNamespace~foo rather than MyNamespace.foo.
   * @inner
   */
  foo: 1
};
@alias
네임스페이스 태그의 멤버 참조처리
내부 함수 내에 클래스 정의할 때 유용하다
예제
/** @namespace */
var Apple = {};(function(ns) {

  /**
   * @namespace
   * @alias Apple.Core
   */
  var core = {};

  /** Documented as Apple.Core.seed */
  core.seed = function() {};
  ns.Core = core;

})(Apple);
클래스를 설명하는 주석
class 키워드를 사용했거나 생성자를 통해 개발한 경우 해당할 수 있습니다.
@class (@constructor)
함수 생성자로 표시
문법
// @class [<type> <name>]
예제
/**
 * Creates a new Person.
 * @class
 */
function Person(){}
var p = new Person();
출력화면
출력이미지
@classdesc
함수 생성자 설명
@class가 선언되어있어야 한다.
문법
// @classdesc <some description>
예제
/**
 * This is a description of the MyClass constructor function.
 * @class
 * @classdesc This is a description of the MyClass class.
 */
function MyClass() {}
/** @class */
var Person = makeClass(
  /** @lends Person */
  {
    /**
     * Create a `Person` instance.
     * @param {string} name - The person's name.
     */
    initialize: function(name) {
        this.name = name;
    },
    /**
     * Say something.
     * @param {string} message - The message to say.
     * @returns {string} The complete message.
     */
    say: function(message) {
        return this.name + " says: " + message;
    }
  }
);
@abstract (@virtual)
상속하는 객체에서 재정의하는 멤버 식별(오버라이딩 객체)
예제
/**
 * Generic dairy product.
 * @constructor
 */
function DairyProduct() {}

/**
 * Check whether the dairy product is solid at room temperature.
 * @abstract
 * @return {boolean}
 */
DairyProduct.prototype.isSolid = function() {
	throw new Error('must be implemented by subclass!');
};

/**
 * Cool, refreshing milk.
 * @constructor
 * @augments DairyProduct
 */
function Milk() {}

/**
 * Check whether milk is solid at room temperature.
 * @return {boolean} Always returns false.
 */
Milk.prototype.isSolid = function() {
	return false;
};
출력화면
출력이미지
@augments (@extends)
클래스 기반이나 프로토타입 기반에서 상속을 나타내고 상위 객체를 추가함
문법
// @augments <namepath>
예제
단일상속
/**
 * @constructor
 */
function Animal() {
	/** Is this animal alive? */
	this.alive = true;
}

/**
 * @constructor
 * @augments Animal
 */
function Duck() {}
Duck.prototype = new Animal();
예제2
다중 상속
/**
 * Abstract class for things that can fly.
 * @class
 */
function Flyable() {
	this.canFly = true;
}

/** Take off. */
Flyable.prototype.takeOff = function() {
	// ...
};

/**
 * Abstract class representing a bird.
 * @class
 */
function Bird(canFly) {
	this.canFly = canFly;
}

/** Spread your wings and fly, if possible. */
Bird.prototype.takeOff = function() {
  if (this.canFly) {
    this._spreadWings()
    ._run()
    ._flapWings();
  }
};

/**
 * Class representing a duck.
 * @class
 * @augments Flyable
 * @augments Bird
 */
function Duck() {} // Described in the docs as "Spread your wings and fly, if possible."
Duck.prototype.takeOff = function() {
	// ...
};
주석 정리 후 모듈에 적용을 해봤는데, 아직 정확한 개념이 박히지 않아서 오래걸리는군요 ㅎㅎ..